My journey to process improvement was not conventional. I did not study it first and then implement it. It was quite the opposite!
I always loved problem-solving! As a freelancer, you understand that every client you sign up with have his own tools, processes, operations, and his own challenges!
Dealing with over +120 clients in my life helped me handle a lot of difficult situations, therefore practice my problem-solving skills! To me, process improvement came as an intuitive result to my business activities with my clients.
I helped many of them identify issues they could not clearly see, recommend solutions that are most suitable to their needs, and even automate some of the manual tasks many clients kept doing for years! And I saw results in everything I did, mostly happy clients who thought I really helped them save time and money by incorporating simple actions on daily basis! This is when I got formally into Process Improvement and started learning more about it.
I prepared this guide to help professionals or beginners understand process improvement (PI) and how to conduct it within organizations by identifying inefficiencies and eliminating waste. I covered aspects like: how to identify processes in need of improvement, how to analyze them, and implement changes that improve efficiency, quality, and productivity.
Table of Contents
Fundamentals of Process Improvement (PI)
Before we dive deeper into Process Improvement, let’s focus on what a Process is in the first place?
The simplest definition of a process is: a series of actions or steps taken in order to achieve a particular end.
Imagine you wake up every morning at 7 am, you know that your daily routine consists of the following: turning the alarm off, getting up, using the toilet and washing your face, preparing breakfast, choosing and wearing your clothes and getting ready to leave for work..
This is a simple example of a process that aims at going to work every morning. It is a series of steps that have a clear order, and a clear objective.
Now, imagine you notice that breakfast is taking a lot of your time everyday, or that you spend a lot of time trying to find the right clothes every morning.. this is now an example of issues that need to be fixed to reduce time waste and increase efficiency, and this is exactly where process improvement comes in.
- What is Process Improvement?
Process Improvement (PI) is a structured approach to analyzing and refining workflows to remove inefficiencies. It’s about transforming processes from underperforming to optimal by removing waste, addressing bottlenecks, and increasing productivity. Process Improvement can be applied on a continual basis (continuous improvement) or as a one-off project. - Importance of PI
PI is crucial for keeping organizations competitive. By refining processes, your business, or your client can remain agile, reduce costs, and improve service delivery. Additionally, efficient processes contribute to higher employee satisfaction by reducing frustrations related to inefficiency. - Examples of PI
Examples of process improvements include automation of manual tasks, streamlining communication channels, and reducing error rates in production or service delivery. For instance, automating invoice processing to eliminate manual data entry could save time and reduce errors.
Value-Added vs Non-Value-Added Steps
As I mentioned above, a process is a series of steps. These steps are of three types: value-adding steps (VA Steps), non-value adding steps (NVA Steps), and non-value-add but necessary steps (NVN Steps).
Understanding the differences between them allows us to better see what each process contains, and what can be done and at what level of the process exactly. In simple terms, it makes it easier to see which steps can be modified, manipulated, removed or should be kept during the improvement process.
- Value-Adding Steps
Value-adding steps are those activities in a process that directly contribute to the final product or service. They improve the quality, functionality, or appeal of the product, and are tasks that customers are willing to pay for. In process improvement, the goal is to maximize these value-adding steps to enhance the customer experience and increase operational efficiency. - Non-Value-Adding Steps
Non-value-adding steps are tasks that do not contribute to the final product or service. These steps are often considered wasteful and should be minimized. Examples include unnecessary approvals, redundant data checks, or waiting times between stages. However, some non-value-adding steps may be necessary due to legal or regulatory requirements. - Non-Value-Add But Necessary
These are non-value-adding steps that cannot be eliminated but are essential due to compliance or governance needs. For example, regulatory reporting or safety inspections, while not directly contributing to product quality, are necessary to meet external requirements.
Types of Processes in Process Improvement
Before we start improving a process, it is necessary to define the types of processes we will be dealing with:
- As-Is Process
The as-is process is a detailed map of the current state of the workflow. It includes all the steps, decision points, and bottlenecks as they exist today. This process map allows us to understand where inefficiencies lie and serves as the starting point for improvement. We cannot start improving something we have no idea about. This is why this step is mandatory: to map out the as-is process first. - To-Be Process
The to-be process represents the ideal, future state of the workflow after improvements have been implemented. This process map eliminates unnecessary steps and optimizes workflows for efficiency and productivity. It’s an aspirational map of how the process should work if we remove all constraints (legal, operational, etc.). This is the end-point we want to reach after all our process improvement efforts, and it makes sense to have it defined before we move forward. - Realized Process
The realized process is the final, practical version of the process after all improvements, taking into account any constraints that we cannot eliminate. This process map reflects the actual improvements that were feasible to implement.
Process Analysis Terms
Below are some of the important terms you need to know before getting started in Process Improvement:
- Takt Time
Takt time is the rate at which a product must be completed to meet customer demand. We calculate it by dividing the available production time by the number of units needed. For example, if a factory has 450 minutes of production time and needs to produce 5 units, the takt time is 90 minutes per unit. - Cycle Time
Cycle time refers to the actual time spent working on a product from the beginning of production to the completion of the last step. It includes both value-adding and non-value-adding activities within the process. - Lead Time
Lead time is the total time taken to fulfill a customer’s order, from the moment the order is placed until the product is delivered. Unlike cycle time, it includes delays, waiting periods, and any administrative tasks. - Bottleneck
A bottleneck is any step in the process that slows down the overall workflow because it takes longer to complete than other steps. Identifying and addressing bottlenecks is critical to improving the throughput of the entire process. - Rework Loop
A rework loop occurs when a process step has to be repeated due to errors or defects. Rework loops introduce delays, increase costs, and reduce overall efficiency. Eliminating or reducing rework is a key goal of process improvement. - Value Stream Mapping (VSM)
VSM is a visual tool we use to analyze the flow of materials and information required to bring a product or service to the customer. It helps identify areas of waste, inefficiencies, and opportunities for improvement. - Kanban: is a visual system for managing work as it moves through a process. It uses cards to represent tasks or work items, making it easy to track progress and identify bottlenecks. The goal is to optimize flow and reduce waste.
- Standard Work: Standard work involves documenting the best practices for a process, ensuring that it is performed consistently. It helps maintain quality, reduce variation, and provides a baseline for future improvements.
- Voice of the Customer (VOC): VOC is a term we use to describe the process of capturing customer expectations, preferences, and feedback. It ensures that process improvements align with customer needs and enhance satisfaction.
The Process of Delivering Process Improvement
We will detail here the process of improving processes. (I know, it sounds weird). We will see the exact steps you have to follow to implement process improvement:
- Identify the Process
The first step in process improvement is to identify which process requires improvement. This can be based on poor performance metrics (e.g., missed KPIs), customer complaints, or internal inefficiencies. We then prioritize processes that will have the biggest impact on the organization. - Map the As-Is Process
In the second step, we gather key stakeholders and process experts to map out the current workflow. This step ensures that everyone understands how the process currently operates, including the inefficiencies and potential areas for improvement. - Identify Value-Added (VA) and Non-Value-Added (NVA) Steps
In this stage, we categorize each step of the process as value-adding, non-value-adding but necessary, or pure waste. The goal is to visualize where improvements can be made by removing or minimizing non-value-adding activities. - Map the To-Be Process
Create a process map that reflects the ideal workflow with all the inefficiencies we removed. This step envisions how the process should function after improvements and serves as a blueprint for change. - Gap Analysis
Perform a gap analysis to compare the current process with the to-be process. Identify what steps are needed to transition from the current state to the ideal state, and determine if any non-value-adding steps must remain due to legal or operational requirements. - Map the Realized Process
Finalize the process map by integrating any necessary steps we identified during the gap analysis. This is the new, improved workflow that will be implemented. - Test the New Process
Before full implementation, run a parallel test of the new process to identify any issues. Collect feedback from stakeholders and make adjustments as needed. Once we successfully test the process, it can go live. - Provide Wider Updates
Communicate the process improvements to all relevant stakeholders, update documentation, and assign ownership to ensure the maintenance of the new process. Quantify the benefits achieved (e.g., time saved, errors reduced) to demonstrate the success of the improvement effort.
Process Mapping Tools
Of course, when we talk about process improvement we may ask the questions: what tools can be used to help improve processes?
There are a couple of tools that can help in the process improvement efforts based on our specific needs:
- Swim Lane Diagram
A visual tool that maps out the responsibilities of different departments or individuals within a process. It helps identify handoffs, bottlenecks, and inefficiencies across functions.

- SIPOC Diagram
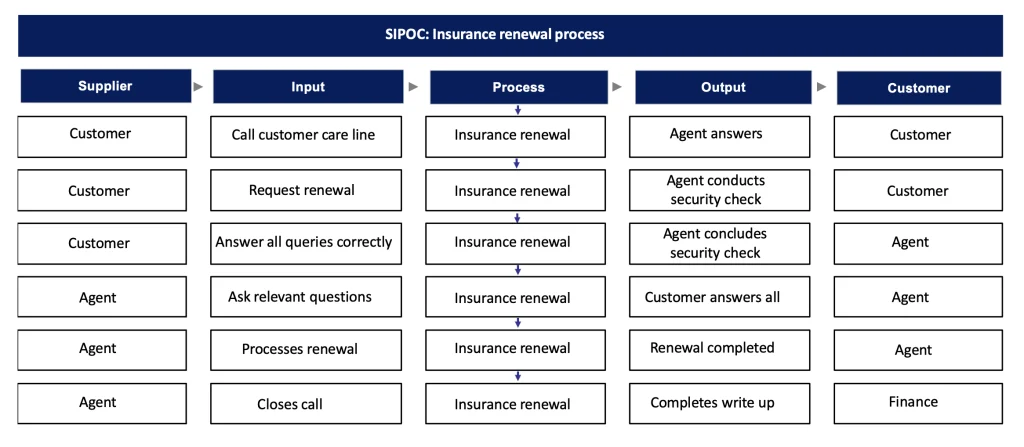
A SIPOC (Suppliers, Inputs, Process, Outputs, Customers) diagram provides a high-level view of a process, showing how inputs are transformed into outputs. It helps define the boundaries of a project and understand the customer-supplier relationship.

- Value Stream Map: A value stream map is used to analyze the flow of materials and information required to bring a product to the customer. It highlights value-adding activities and identifies waste, such as delays or excess inventory.

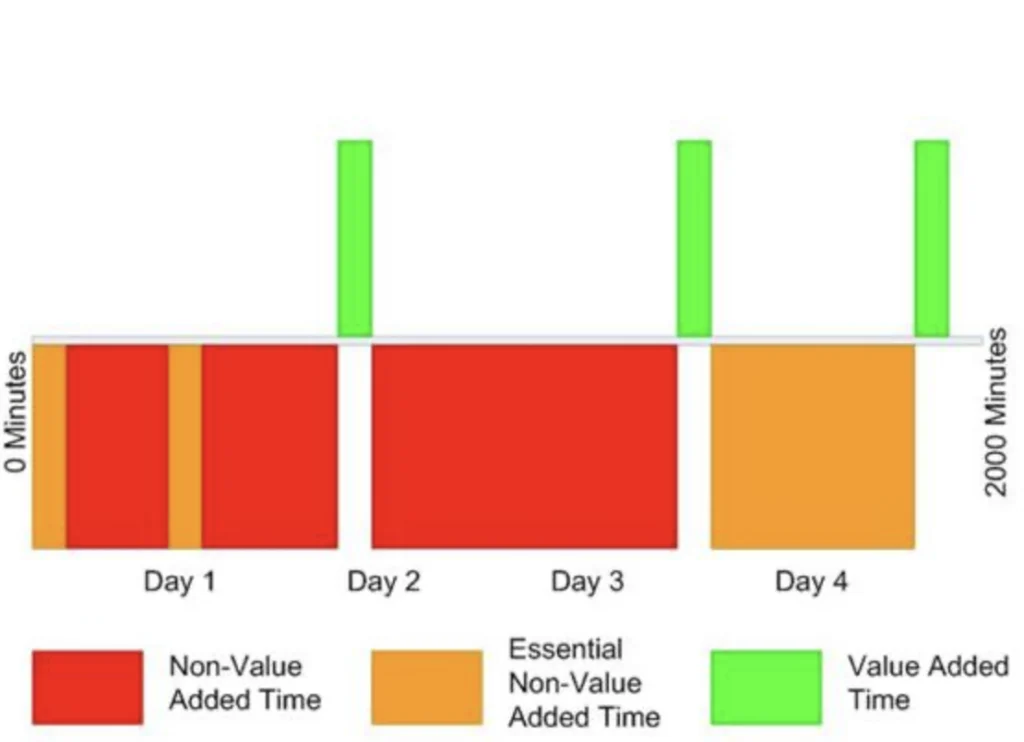
- Time Value Map: You can use this tool in the analysis phase to give you an accurate representation of the overall cycle time of the process– how long the process is end to end, how much the process costs you to run and how much of this is waste.

You can also use other tools such as the Value Add Chart that mainly show activities, time, and VA / NVA tasks, The Spaghetti Diagram to visualise motion. The most important thing is to select the right tool for your needs.
The 8 Wastes of Process Improvement
One of the main reasons for starting a process improvement project is to identify, reduce and remove waste.
In the Lean methodology, you identify the 8 main wastes that you are most likely to come across within your organization.
The 8 wastes can be abbreviated to DOWNTIME or TIMWOODS. They are as follows:
- Transport: Moving materials unnecessarily between locations.
- Inventory: Holding excess stock that is not immediately needed.
- Motion: Unnecessary movement of people or equipment.
- Waiting: Delays between process steps, often due to bottlenecks.
- Overproduction: Producing more than is needed, leading to waste.
- Overprocessing: Performing extra steps that don’t add value.
- Defects: Errors in production that require rework or scrapping.
- Skills: Underutilizing employees’ skills and talents, which can result in inefficiencies and missed opportunities.
How to Set up and Run a Process Improvement Workshop?
- Setup
To run a successful Process Improvement workshop, clearly define the goals, invite key stakeholders, and ensure everyone understands the objectives. - Rules
Establish rules to maintain focus, encourage participation, and drive productive discussions. - Questions to Ask
Ask probing questions to uncover the root causes of inefficiencies. Example: “Why does this step exist?” or “Can this step be automated?” - Tips
Encourage active participation, make sure data is readily available, and stay focused on measurable results.
When I run a process improvement workshop, I make sure I carefully plan, facilitate, and follow-up to ensure participants are engaged and that outcomes are actionable.
Below is a step-by-step guide on how I personally set up and run an effective workshop for my process improvement:
1. Define the Workshop Objectives
- I Identify the specific objectives of the workshop (e.g., reducing waste, improving efficiency, addressing a known issue).
- I define what success looks like after completion (e.g., identifying bottlenecks, developing action plans, setting measurable KPIs).
2. Select Participants
- I include people from different departments or levels who are directly involved in or affected by the process.
- The goal is to form a diverse group of people to gain insights from various roles, such as managers, frontline workers, and process owners.
3. Plan the Agenda and Format
- I decide on the duration of the workshop (e.g., half-day or full-day) and structure (e.g., presentations, group work, brainstorming sessions).
- I also Break Down Activities into something like this:
- Introduction & Objective Setting (15-30 minutes)
- Process Mapping/VSM Activity (1-2 hours)
- Identifying Pain Points and Root Causes (1 hour)
- Brainstorming Solutions (1 hour)
- Developing Action Plans (1 hour)
4. Prepare Materials and Tools
- Visual Aids: I love using flip charts, whiteboards, or digital tools like Whimsical or Freeform for visual collaboration.
- Templates: I always have my templates prepared in advance for Value Stream Mapping (VSM), Swim lane or SIPOC Diagrams (for Root Cause Analysis), and action plans.
5. Facilitate the Workshop
- I always start with an introduction, explaining the goals and importance of the workshop. Encouraging open communication and participation.
- I guide participants to map the current state of the process using VSM. Highlight value-added and non-value-added steps.
- I use Root Cause Analysis tools like the “5 Whys” or Fishbone Diagrams to drill down into the root causes of issues.
- Depending on the full group size, I divide participants into small groups to brainstorm and prioritize potential solutions. You can use techniques like SCAMPER (Substitute, Combine, Adapt, Modify, Put to another use, Eliminate, Reverse) to stimulate creative thinking.
- Consolidate solutions into specific, actionable plans. Assign responsibilities, set deadlines, and define KPIs for monitoring progress.
6. Summarize and Review
- At this stage, each group shares their insights and proposed solutions. We then discuss and consolidate these into a workshop summary.
- We also develop a clear action plan outlining the steps, owners, and timelines for implementation.
- To keep the feedback loop open, we collect feedback from participants to identify areas for improvement in future workshops.
7. Follow-Up
- Ensure all action items are assigned to specific team members with clear expectations.
- Set up regular check-ins or meetings to review the progress of the implemented solutions and adjust as needed.
Additional Tips & Advice:
- Lean and Six Sigma Tools: Incorporate methods like Kaizen, 5S, and Poka-Yoke to ensure the solutions align with best practices.
- Engage Participants: Encourage active participation by rotating group leaders or using interactive polls and Q&A sessions.
- Provide Refreshments and Breaks: Keep participants comfortable and energized by including short breaks and refreshments if the workshop is on-site as opposed to online workshops where you can have break time or online activities.


